
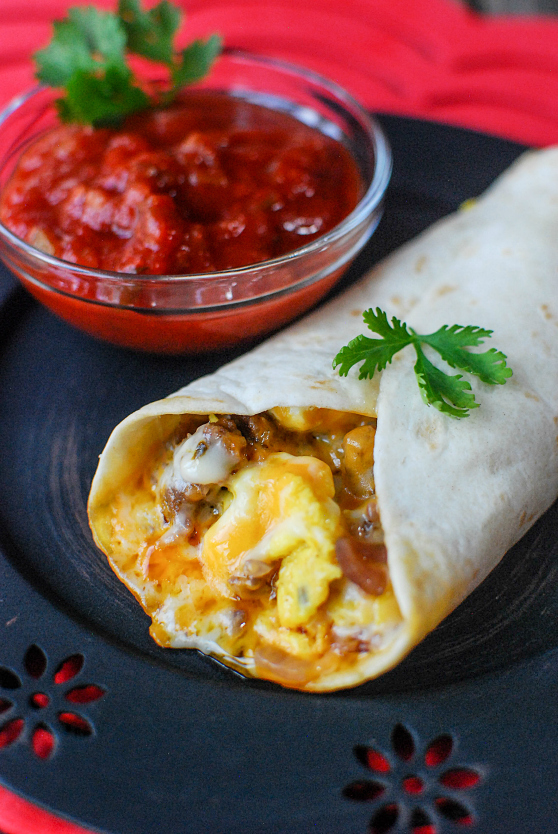
Freezer Friendly Breakfast Burritos

Breakfast burritos are a staple breakfast at our house. Instead of slaving over the stove every morning our tummies are craving burritos, I’ll make big batch on Sunday, and freeze those puppies for an easy grab and go breakfast. The best part? They are completely customizable. For this recipe Freezer Friendly Breakfast Burrito, I added in sausage, peppers and green chilies.
Email Me This Recipe!
Need to save time? Have this article emailed straight to your inbox + sign up for all the latest recipes!
Feel free to leave those out, and add in your favorite flavors. My one daughter love corn and black olives in her’s, while the other one digs just cheese and bacon. The combinations are pretty much endless.
Freezer Friendly Breakfast Burritos
Ingredients
½ lb. Italian Sausage (can use mild if you prefer)
½ Red onion, small, diced
½ Sweet Pepper, diced, any color you prefer
6 Eggs, whisked
1 tsp Thyme, dried
as desired Salt & Pepper
3 – 4 Flour tortillas, 8 – 10 inch
1 Cup Tex Mex Cheese, shredded
Optional – ½ can of green chilies, drained
Directions
1. In a fry pan, sauté the sausage and onions together until soft. Add the sweet peppers and continue to sauté for 2 – 3 minutes. Drain any excess grease, place into a bowl and set aside to cool.

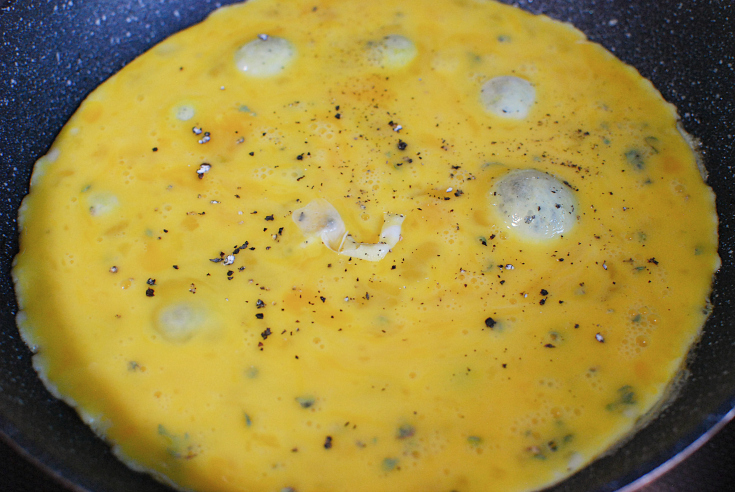
2. In the same fry pan, add the eggs, thyme, salt and pepper. Cook on a low heat and slowly scramble the eggs gently to form large curds. Add the green chilies here if you want to use them. Place into a bowl and set aside to cool.
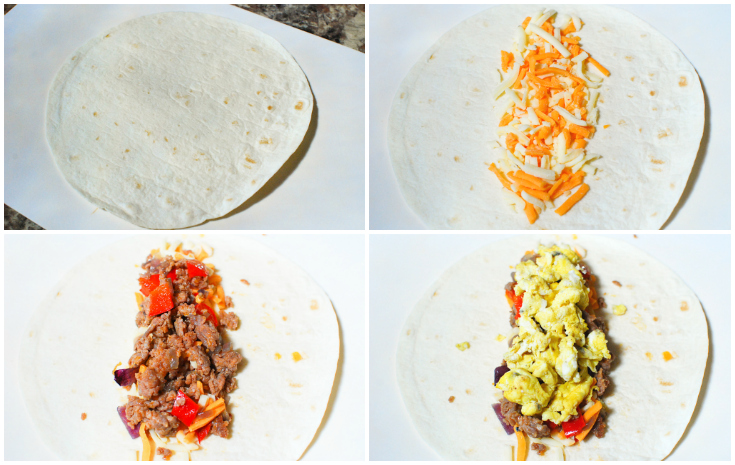
3. When both the sausage and eggs are cool, lay out a tortilla on the cutting board. Place a few tablespoons (approx… 2) shredded cheese in the center of the tortilla in a strip fashion, leaving about a half inch space from the bottom the tortilla.
4. Place a few tablespoons (approx.… 2) of sausage mixture on top of the cheese, and top that with some of the scrambled eggs. Be sure that the mixtures are in a long strip and do not come too close to the bottom of the tortilla.
5. WRAPPING: Fold the bottom of the tortilla over until it just covers the bottom of the filling. Turn the mat sideways so the fold now is to the left of you. Working again from the bottom, now fold in the excess tortilla (that was previously the right side of the wrap), over the filling and hold it tight. Continue to roll the tortilla to make it into a wrap that now has only one side open. Place it seam side down and continue rolling the burritos.
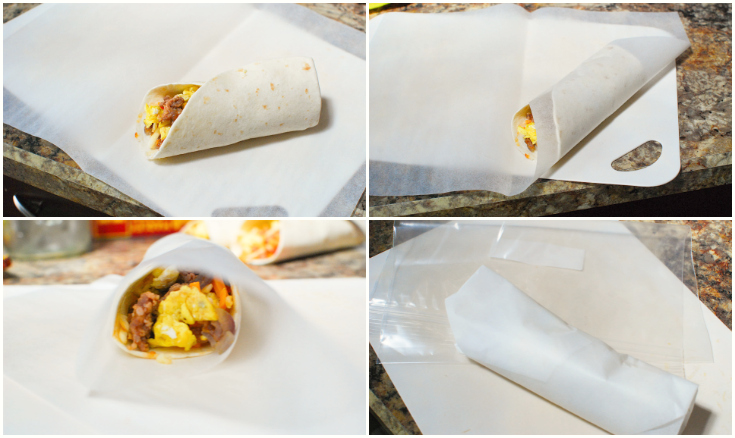
6. FREEZING: Taking a piece of parchment paper approximately the size of the mat or cutting board your working on, lay it flat on the counter. Place a burrito, seam side down, near the bottom of the lower right corner of the paper. Fold the corner of the paper over the burrito, and begin to roll the burrito in the paper. Stop after completing one roll, and fold in the excess paper on the right. Continue wrapping the burrito until you have no more paper left. The left side should be still open, exposing the wrap. Simple fold this over and tape closed. Wrap all the burritos like this and place in a plastic, resealable freezer bag.
7. REHEATING: Simply remove a frozen burrito from the bag either the night before to thaw in the fridge overnight and reheat in the microwave for approximately 1 – 1 ½ minutes, or place the burrito directly from frozen into the microwave and cook for 2, 2 ½ minutes.


Freezer Friendly Breakfast Burritos
Email this recipe!
Get this recipe emailed straight to your inbox!
Ingredients
½ lb. Italian Sausage (can use mild if you prefer)
½ Red onion, small, diced
½ Sweet Pepper, diced, any color you prefer
6 Eggs, whisked
1 tsp Thyme, dried
as desired Salt & Pepper
3 – 4 Flour tortillas, 8 – 10 inch
1 Cup Tex Mex Cheese, shredded
Optional – ½ can of green chilies, drained
Instructions
1. In a fry pan, sauté the sausage and onions together until soft. Add the sweet peppers and continue to sauté for 2 – 3 minutes. Drain any excess grease, place into a bowl and set aside to cool
2. In the same fry pan, add the eggs, thyme, salt and pepper. Cook on a low heat and slowly scramble the eggs gently to form large curds. Add the green chilies here if you want to use them. Place into a bowl and set aside to cool.
3. When both the sausage and eggs are cool, lay out a tortilla on the cutting board. Place a few tablespoons (approx... 2) shredded cheese in the center of the tortilla in a strip fashion, leaving about a half inch space from the bottom the tortilla.
4. Place a few tablespoons (approx.… 2) of sausage mixture on top of the cheese, and top that with some of the scrambled eggs. Be sure that the mixtures are in a long strip and do not come too close to the bottom of the tortilla.
5. WRAPPING: Fold the bottom of the tortilla over until it just covers the bottom of the filling. Turn the mat sideways so the fold now is to the left of you. Working again from the bottom, now fold in the excess tortilla (that was previously the right side of the wrap), over the filling and hold it tight. Continue to roll the tortilla to make it into a wrap that now has only one side open. Place it seam side down and continue rolling the burritos.
6. FREEZING: Taking a piece of parchment paper approximately the size of the mat or cutting board your working on, lay it flat on the counter. Place a burrito, seam side down, near the bottom of the lower right corner of the paper. Fold the corner of the paper over the burrito, and begin to roll the burrito in the paper. Stop after completing one roll, and fold in the excess paper on the right. Continue wrapping the burrito until you have no more paper left. The left side should be still open, exposing the wrap. Simple fold this over and tape closed. Wrap all the burritos like this and place in a plastic, resealable freezer bag.
7. REHEATING: Simply remove a frozen burrito from the bag either the night before to thaw in the fridge overnight and reheat in the microwave for approximately 1 – 1 ½ minutes, or place the burrito directly from frozen into the microwave and cook for 2, 2 ½ minutes.
Nutritional Disclaimer: Family Fresh Meals is not a dietician or nutritionist, and any nutritional information shared is only an estimate. We recommend running the ingredients through an online nutritional calculator if you need to verify any information.
Did You Make This Recipe?
Make sure to share it with me below!
