• Skip to primary navigation
  • Skip to main content
  • Skip to primary sidebar
  • Home
  • Life
    • Health & Fitness
    • Money
    • Random Awesomeness
    • Family Fun
    • Women’s Issues
    • Seasonal
  • Happy Home
    • Cleaning & Organization
    • DIY
    • Seasonal
  • Recipes
    • Appetizers
    • Breakfast
    • Crockpot
    • Dinner
    • Dessert
    • Snacks
    • Healthy Recipes
    • Copycat Recipes
    • Easter Recipes
    • Halloween
    • Instant Pot
  • Kids Stuff
    • Crafts
    • School Age
    • Newborns, Infants & Toddlers
    • Technology
  • Contact
    • Disclosure
    • Privacy Policy

The Rockstar Mommy logo

October 9, 2020

Easy Glowing Eye Halloween Decoration

Share
Pin
Tweet
Share

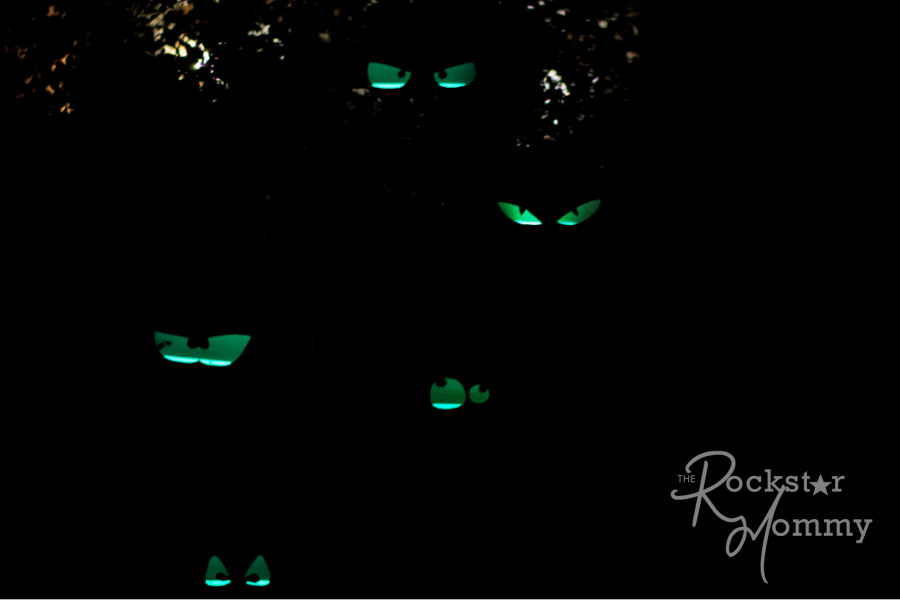
This glowing eye Halloween decoration are so incredibly easy to make and so visually effective to give your outdoors that desired creepy Halloween vibe! If you didn’t feel like someone or something was watching you before, you definitely will now!!DIY glowing eyes in dark bushes

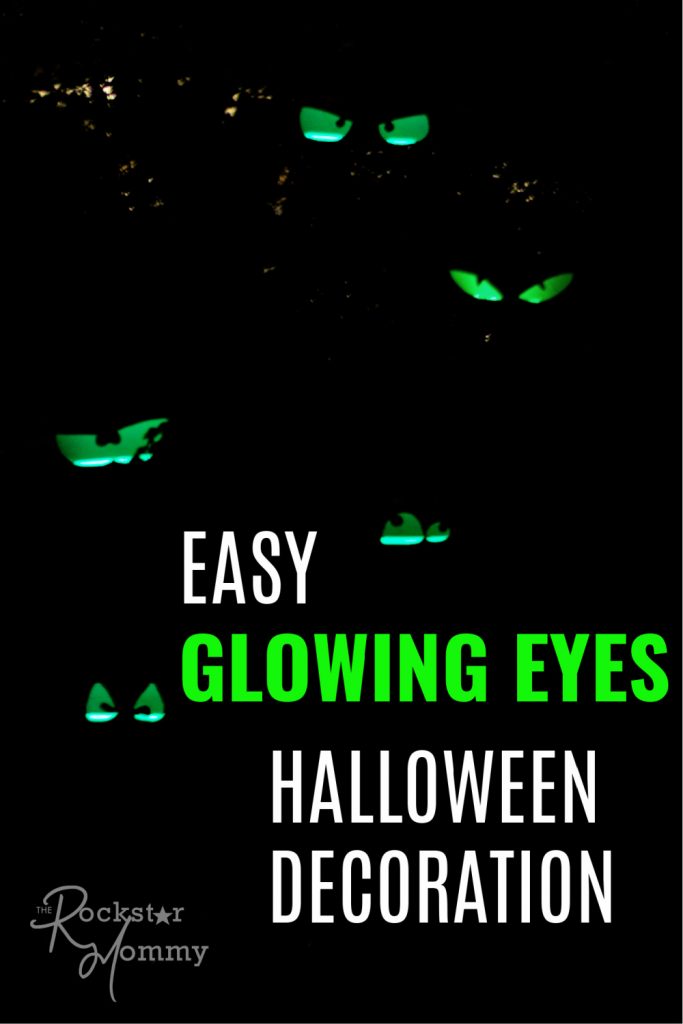
What does it take to make these glowing eyes? Just a few paper towel rolls that you may already have lying around the house, some basic drawing and cutting, a couple of different colored glow sticks and duct tape! Oh, and of course, as much creativity as you’d like to add to this seriously fun craft activity.

Most of the crafting can be done ahead of time, leaving you to simply activate the glow sticks just before trick or treaters pass by. These glowing Halloween eyes are great to get the kids involved in making too!
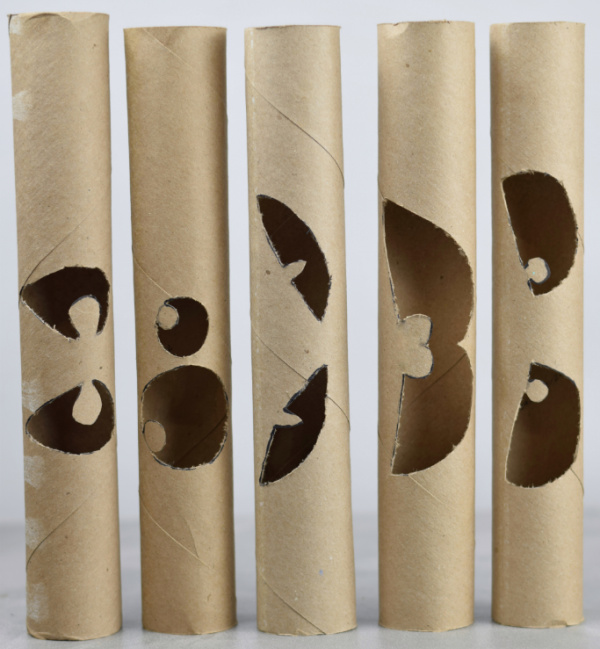
5 paper towel rolls with different eyes cut into them

More Fun Halloween Crafts and Recipes You’ll Love

  • Creepy Halloween Goodie Bags
  • Mummy Halloween Oreos
  • Spooky Halloween Spider Sucker Craft

EASY GLOWING EYE HALLOWEEN DECORATION

Time to Make: 10 mins (more time if you make a whole batch)
Skill Level: Easy – with supervision due to the use of a utility knife.

  • Materials
  • Empty Paper Towel Rolls
  • Package of Glow Sticks
  • Marker
  • Duct Tape
  • Scissors
  • Utility knife

Instructions

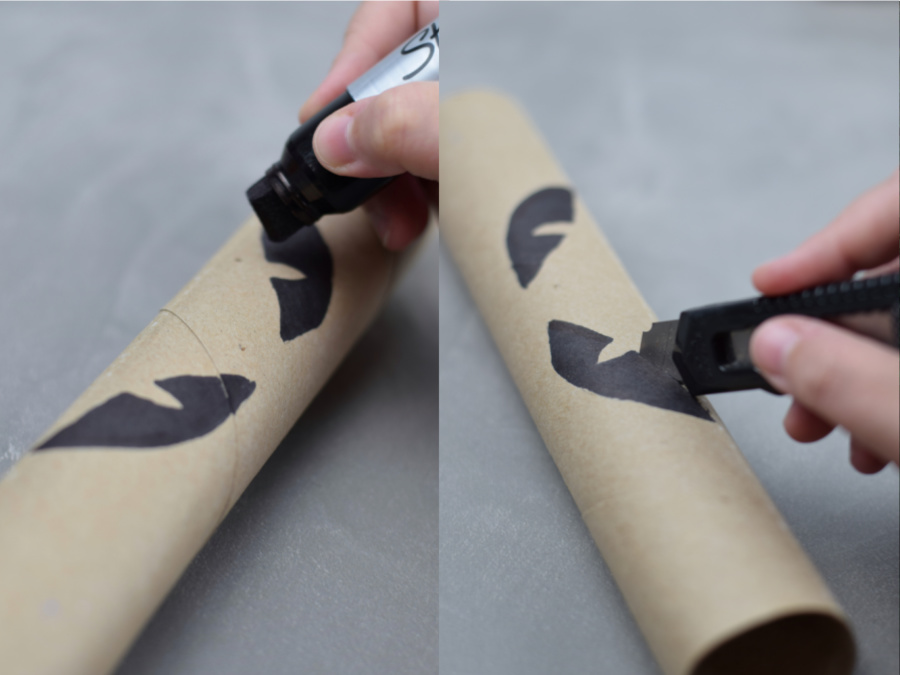
  1. Using your marker, draw your desired eye shapes onto your paper rolls. (Be creative, they don’t all have to match)
  2. Carefully cut out the eyes using your utility knife and scissors.
  3. Cut a piece of duct tape and seal one end of the paper roll.eyes being draw on a paper towel roll and cut out with a knife
  4. Place your paper rolls in bushes, trees or shrubs around your home.paper towel cardboard rolls with eyes cut out, hanging in bushes
  5. Light up the glow sticks & insert them into the tubes. Watch as the eyes glow around you.DIY glowing eyes in dark bushes

CAN I USE NORMAL TOILET ROLLS INSTEAD OF PAPER TOWELS?

  • Yes, you definitely can use toilet paper rolls instead. Most of us have more toilet paper rolls spare than kitchen paper towel rolls so make use of whatever you have on hand!

WHAT IF I’M TERRIBLE AT DRAWING SCARY EYES?

  • While this isn’t a drawing contest, I get that some of us may not feel confident in drawing scary eyes. If that’s the case, you can easily print some eyes from some royalty-free images online, cut them out and trace around them with a pen on your paper rolls. Problem solved!

TIPS FOR MAKING GLOWING HALLOWEEN EYES

  • If you don’t have paper towel rolls or toilet paper rolls around the house, ask any of your friends or neighbors that would be recycling these items to give them to you instead! I always save my toilet rolls throughout the year for crafts and in preparation for these great spooky glowing eyes.
  • If you’re planning to have these glowing eyes in your bushes or home for Halloween, you can easily prep the tubes in advance and activate the glow sticks just before the trick or treaters start passing. I wouldn’t advise hanging them outdoors too many days in advance in case the cardboard deteriorates due to weather conditions.
  • If you’re having trouble positioning the paper rolls, you may want to try a few strands of duct tape.


Share
Pin
Tweet
Share

Share this:

  • Click to share on Twitter (Opens in new window)
  • Click to share on Facebook (Opens in new window)

Filed Under: Crafts, Halloween, Seasonal

Reader Interactions

Leave a Reply Cancel reply

Your email address will not be published. Required fields are marked *

Recipe Rating


This site uses Akismet to reduce spam. Learn how your comment data is processed.

Primary Sidebar

Are you a Rockstar Mommy? Get your freebie on!

Get a Freebie - 10 Traits of a Rockstar Mommy

Latest News

  • Grits and Sausage Breakfast Casserole
  • Mini Pancake Cereal
  • The Best Banana Dessert Recipes
  • How to Make Chia Pudding
  • Air Fryer Meatballs
Privacy Policy |Disclosure | Contact Us               

COPYRIGHT© 2017 · THE ROCKSTAR MOMMY

© 2017–2021

This website uses cookies to improve your experience. We'll assume you're ok with this, but you can opt-out if you wish.AcceptReject Read More
Privacy & Cookies Policy

Privacy Overview

This website uses cookies to improve your experience while you navigate through the website. Out of these, the cookies that are categorized as necessary are stored on your browser as they are essential for the working of basic functionalities of the website. We also use third-party cookies that help us analyze and understand how you use this website. These cookies will be stored in your browser only with your consent. You also have the option to opt-out of these cookies. But opting out of some of these cookies may affect your browsing experience.
Necessary
Always Enabled

Necessary cookies are absolutely essential for the website to function properly. This category only includes cookies that ensures basic functionalities and security features of the website. These cookies do not store any personal information.

Non-necessary

Any cookies that may not be particularly necessary for the website to function and is used specifically to collect user personal data via analytics, ads, other embedded contents are termed as non-necessary cookies. It is mandatory to procure user consent prior to running these cookies on your website.